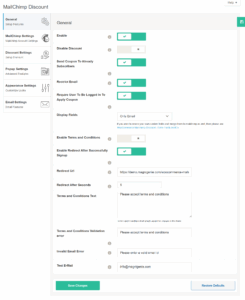
- ⚙️ General Settings – MailChimp Discount
- ✅ Enable
- ❌ Disable Discount
- 📨 Send Coupon to Already Subscribers
- ✉️ Restrict Email
- 🔐 Require User To Be Logged In To Apply Coupon
- 🧾 Display Fields
- 📃 Enable Terms and Conditions
- 🔁 Enable Redirect After Successfully Signup
- 📄 Terms and Conditions Text
- ❗ Terms and Conditions Validation Error
- ❗ Invalid Email Error
- 📧 Test E-Mail
⚙️ General Settings – MailChimp Discount #
This section allows you to configure core functionalities for your WooCommerce MailChimp Discount plugin. These settings determine how the discount is applied, who receives it, and how the form behaves.
✅ Enable #
Turn this ON to activate the plugin functionality. When enabled, users can sign up and receive a coupon via MailChimp.
❌ Disable Discount #
Enable this if you want to stop applying the discount temporarily without disabling the full plugin.
📨 Send Coupon to Already Subscribers #
If enabled, the plugin will also send coupons to users who are already subscribed to your MailChimp list.
✉️ Restrict Email #
Use this to prevent disposable or invalid email addresses. Ensures only valid entries are accepted.
🔐 Require User To Be Logged In To Apply Coupon #
Enable this to restrict coupon usage only to logged-in users. Ideal for membership-based discounts or logged-in-only offers.
🧾 Display Fields #
Select the fields you want to show in the sign-up form.
Options include:
-
Only Email
-
First Name And Email
-
First Name, Last Name And Email
For more fields and integration, use the Extra Fields Addon.
📃 Enable Terms and Conditions #
Enable this option to add a checkbox for users to accept your terms and conditions before submitting the form.
🔁 Enable Redirect After Successfully Signup #
After a successful sign-up, users will be redirected to a custom URL.
-
Redirect URL – Set the destination URL to redirect users after submission.
-
Redirect After Seconds – Enter the delay time (in seconds) before redirecting. Default is 5 seconds.
📄 Terms and Conditions Text #
Enter the actual terms that will be displayed next to the checkbox. This text explains what the user is agreeing to.
❗ Terms and Conditions Validation Error #
Customize the message shown when users fail to check the terms and conditions box (if enabled).
❗ Invalid Email Error #
Define the message displayed when a user enters an invalid email address.
📧 Test E-Mail #
Enter an email address to test email sending functionality (e.g., for debugging or validation purposes).
Once you configure the above settings, don’t forget to click Save Changes to apply them.